Let’s Encrypt is a open source SSL Certificate which is completely free to use. You can use it for as many domains as you want. If you are using our Shared Hosting, you can install Let’s Encrypt within just few clicks where you don’t need any technical knowledge. For any other Let’s Encrypt can be installed on a single cpanel account. But if you are conducting your web hosting business or running multiple websites on a VPS/Dedicated, you can install Let’s Encrypt very easily in your VPS or dedicated server with cPanel/WHM control panel is installed. After installation, you/your customer can use Let’s Encrypt from your cPanel with just few clicks.
Server Requirements:
To run any of the three plugins for cPanel there are a few prerequisites:
- You need cPanel installed with a valid license
- Root and SSH access to your server
- For the official cPanel plugin:
- cPanel and WHM versions 58.0.17 or above
- For the plugin found on GitHub, you need:
- A Centos five, six or seven server
- A static IP address if you have Centos five
- For the Let’s Encrypt for cPanel plugin, you need
- i386 or x86_64 CentOS 6 or 7 (5 is not supported)
- WHM 11.52 or higher (CloudLinux and LSWS compatible)
Let’s Encrypt for cPanel plugin is a premium plugin. You will be charged one time $30 or you can go for a 72-hours trial period. You can install the plugin on a trial basis before purchasing and later you may buy it. You can check Let’s Encrypt for cPanel Installation page for license replacement after the expiration of trial period.
There are 3 available easy ways to install Let’s Encrypt for your server:
- Free Let’s Encrypt cPanel GitHub Plugin
- Let’s Encrypt for cPanel Installation
- Free Official cPanel Plugin
1. Free Let’s Encrypt cPanel GitHub Plugin
This is a matter of concern that you’re aware of the inherent risks. Since regular maintenance and security isn’t guaranteed across all plugins found on GitHub, you need to be sure you trust the developer.
It’s a good practice to check the developer profile and be sure that you can handle the security issue. For details about the developer of this plugin, check out the Let’s Encrypt cPanel plugin repository on GitHub.
Installing the cPanel Plugin in server
Now login to your root of the server with SSH Access and run the following command:
/usr/local/cpanel/3rdparty/bin/git clone https://github.com/Prajithp/letsencrypt-cpanel.git
Then, run this command:
cd letsencrypt-cpanel
And finally, run this command to install the plugin:
./install.sh
Once you receive a message that says Successfully installed letsencrypt manager you’re all set to install your first SSL certificate.
Installing a Single Certificate
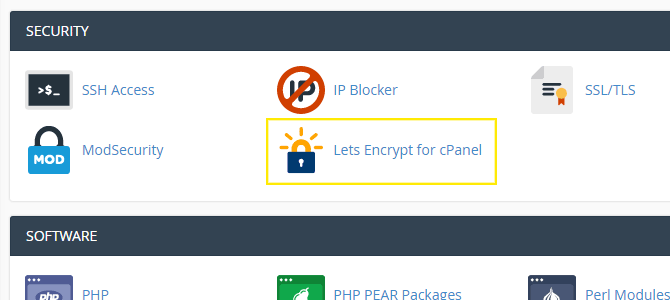
After installation, you can login to your cpanel and find Let’s Encrypt in the Security tab. You can install Let’s Encrypt SSL certificate from here.
2. Free Official cPanel Plugin
You may find Let’s Encrypt by default in the cPanel and WHM version 60 or later versions. Although this is in the test mode, this feature will be available in any version as soon as vulnerability level can be ensured.
Installing the cPanel Plugin
Now you can install the plugin with just a single command:
/scripts/install_lets_encrypt_autossl_provider
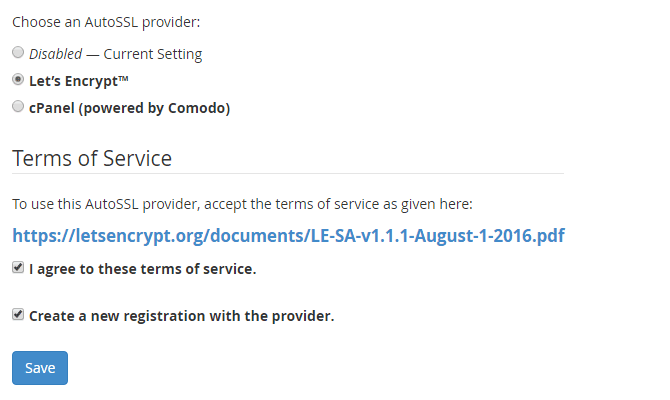
The final installation steps need to be completed in WHM so go ahead and log in as the root user. Go to SSL/TLS > Manage AutoSSL and choose the Let’s Encrypt option under Choose an AutoSSL provider.
Next, check the boxes for I agree to these terms of service and Create a new registration with the provider. You can also click the link to review the terms of service.
Installing a Single Certificate
It’s important to note that this feature only works if AutoSSL is enabled for the users where you want the SSL certificates installed. To enable this option for users, click the Manage Users tab, then select the Enable radio button next to the user account names where you want to install certificates.
Click the Check button to enable AutoSSL. When the process has completed, you can go back to the main Providers tab and click the Run AutoSSL For All Users button.
3. Let’s Encrypt for cPanel Installation
Installing the cPanel Plugin
Now login to your root of the server with SSH Access and run the following command:
cd /etc/yum.repos.d/ && wget https://letsencrypt-for-cpanel.com/static/letsencrypt.repo
Next, run the following command:
yum -y install letsencrypt-cpanel
The installation process usually takes about a minute. If all goes well and the installation was successful, a test should run automatically.
If it renders similar messages as the example below, you’re good to go:
le-cp self-test

[SELF-TEST] Can read config ............ SUCCESS.

[SELF-TEST] Can connect to

daemon

and check

licence

............ SUCCESS.

[SELF-TEST] Can connect to Lets Encrypt ............ SUCCESS.

[SELF-TEST] Can talk to WHM API ............ SUCCESS.

[SELF-TEST] Can talk to plugin RPC ............ SUCCESS.
Installing a Single Certificate
Once you’re logged into cPanel, you should see a Let’s Encrypt for cPanel button under Security. Click on it to access your active domains list to install a certificate.
Also, you won’t have to worry about renewing the certificates since that’s all setup for you automatically.
Hope the article will help help you a lot. If you have any question, you can comment and our existing client are requested to contact our support staff for any further assistance.
We hope this tutorial helps you find the perfect solution. If your like our tutorials, definitely you’ll love our support. All VernalWeb hosting plans include 24/7 support from our amazing inhouse support staff. Check out our web hosting plans and have your website migrated today!


